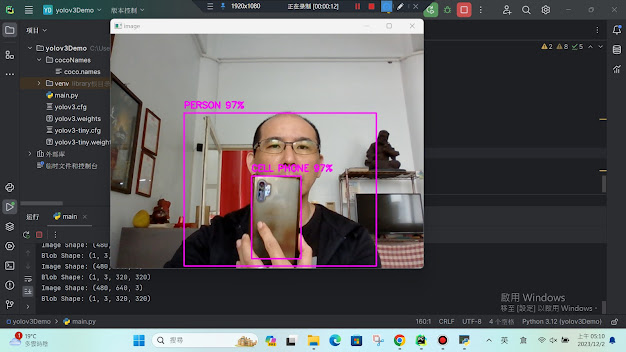
opencv玩YOLOV3
opencv玩YOLOV3
下載cfg和weights檔(找到yoloV3-320)
使用pycharm寫代碼
將剛剛下載好的cfg和weights放到main.py同一個資料夾
還須要一毎coco.names
程式碼:
import cv2
import numpy as np

# 打開攝影機
cap = cv2.VideoCapture(0)

# 讀取 COCO 資料集的類別名稱
cocoFile = f"cocoNames/coco.names"
classNames = []
with open(cocoFile, "r") as f:
    classNames = f.read().rstrip("\n").split("\n")

# YOLOv3 模型的配置文件和權重文件
modelConfig = "yolov3.cfg"
modelWeight = "yolov3.weights"

# 使用 OpenCV 讀取 YOLOv3 模型
net = cv2.dnn.readNetFromDarknet(modelConfig, modelWeight)
net.setPreferableBackend(cv2.dnn.DNN_BACKEND_OPENCV)
net.setPreferableTarget(cv2.dnn.DNN_TARGET_CPU)


# 定義函數,用於在圖像中找到目標並繪製邊框
def findObjects(outputs, img):
    hT, wT, cT = img.shape
    bbox = []
    classIds = []
    confs = []

    # 處理 YOLOv3 輸出
    for output in outputs:
        for det in output:
            score = det[5:]
            classId = np.argmax(score)
            confid = score[classId]

            # 如果檢測的置信度大於閾值,保留檢測結果
            if confid > 0.5:
                w, h = int(det[2] * wT), int(det[3] * hT)
                x, y = int((det[0] * wT) - w / 2), int((det[1] * hT) - h / 2)
                bbox.append([x, y, w, h])
                classIds.append(classId)
                confs.append(float(confid))

    # 使用非極大值抑制去除冗余的邊框
    indices = cv2.dnn.NMSBoxes(bbox, confs, 0.5, 0.2)

    # 遍歷保留下來的邊框,繪製矩形和標籤
    for i in indices:
        box = bbox[i]
        x, y, w, h = box[0], box[1], box[2], box[3]
        cv2.rectangle(img, (x, y), (x + w, y + h), (255, 0, 255), 2)
        cv2.putText(img, f'{classNames[classIds[i]].upper()} {int(confs[i] * 100)}%',
                    (x, y - 10), cv2.FONT_HERSHEY_SIMPLEX, 0.6, (255, 0, 255), 2)


# 主循環,處理攝影機輸入
while True:
    # 讀取攝影機幀
    success, img = cap.read()

    # 添加調試語句,檢查圖像通道數
    print("Image Shape:", img.shape)

    # 請確保 img 的通道數是 3 的倍數
    if img.shape[2] % 3 != 0:
        raise ValueError("Number of channels should be a multiple of 3.")

    # 將圖像轉換為 blob,用於輸入 YOLOv3 模型
    blob = cv2.dnn.blobFromImage(img, 1 / 255, [320, 320], 1, crop=False)
    print("Blob Shape:", blob.shape)

    # 將 blob 設置為 YOLOv3 模型的輸入
    net.setInput(blob)

    # 獲取輸出層的名稱
    layerNames = list(net.getLayerNames())
    outputNames = [layerNames[i - 1] for i in net.getUnconnectedOutLayers()]

    # 獲取 YOLOv3 模型的輸出
    outputs = net.forward(outputNames)

    # 調用函數,找到目標並在圖像中繪製邊框
    findObjects(outputs, img)

    # 顯示處理後的圖像
    cv2.imshow("image", img)

    # 檢測按鍵,如果是 'q',則退出循環
    if cv2.waitKey(1) == ord('q'):
        break


留言
張貼留言